In the November last year (2022) I did the teardown of Paytm SoundBox, since then I was looking for the opportunity to do a similar detailed teardown of PhonePe Smart Speaker as well and compare the difference between both the devices.
It is always interesting for engineers to see how these daily use devices are built what type of electronics goes inside them.
Luckily I requested on social media if someone can help me get access to PhonePe Smart Speaker and one of my follower on Instagram messaged me that he got the device and ready to send me for the review. Thanks to him, I am able to do this PhonePe Soundbox teardown and able to share all the details with you.

If you don’t know what is PhonePe Smart Speaker :
PhonePe Smart Speaker is a smart speaker designed for businesses in India. It allows merchants to receive instant audio confirmation of payments made through PhonePe, as well as other features such as playing music, setting alarms, and getting weather updates.
The PhonePe Smart Speaker comes with a number of features that make it a useful tool for businesses, including:
- Instant audio confirmation of payments: The speaker will announce every payment made through PhonePe, so merchants can be sure that they are not missing any transactions.
- Music playback: The speaker can be used to play music from a variety of sources, including streaming services like Spotify and Gaana.
- Alarms and timers: The speaker can be set to play alarms and timers, so merchants can stay on top of their schedule.
- Weather updates: The speaker can provide weather updates, so merchants can plan their day accordingly.
- Voice assistant: The speaker can be used to control smart home devices, such as lights and thermostats.
The PhonePe Smart Speaker is a useful tool for businesses that want to improve their payment tracking and efficiency. It is also a good option for businesses that want to offer their customers a more convenient way to pay.
Now back to PhonePe Smart Speaker teardown
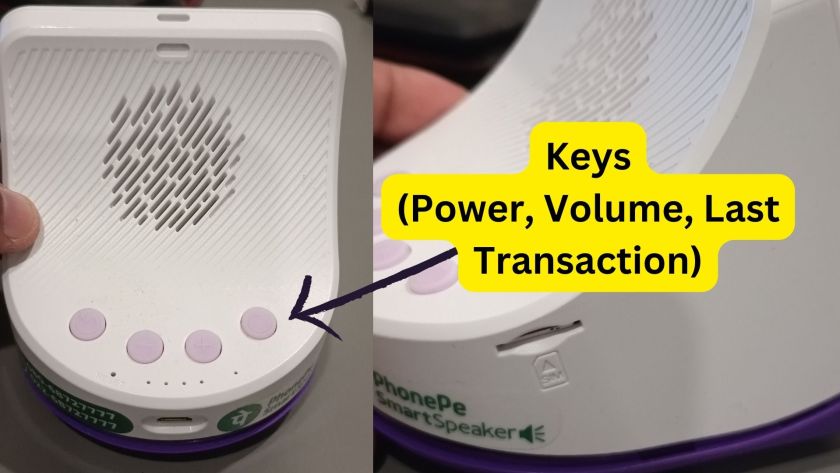
See how the PhonePe Smart Speaker looks like from outside. In the front you have a QR code and on the back side you have speaker holes, 4 buttons, 2 for volume control, one for power ON/OFF, 4 the for listening to the last transaction. USB port is also given for charging. It has inbuilt battery, works for a few hours on it based on the transactions per minute.
As seen in the image above the front side of the PhonePe Smart Speaker has a QR code to scan.

On one side of the enclosure you will find a SIM slot to insert the cellular 2G SIM.

On the back side you have speaker holes for sound to come out.

There are 4 soft keys given, one for power on/off, two for volume control and one for listening to the last transaction.
Tiny holes are provided for LED indications

Micro USB is provided to charge the PhonePe Smart Speaker.

Hole is provided for MCU reset, once can use a pin to press the reset button in case there is an MCU hang situation.

Single Cell Lithium Battery of 3.6V 2600mAH is used for the power back up.

The whole unit is designed and manufactured by Chinese company NEXGO.
Once you open the enclosure you this is what you see inside. A small back PCB and a speaker connected to it.

4 Ohms 3W speaker is used for sound.

GigaDevices SPI NOR Flash Memory is used for data storage (25Q32ES1G)

Phonepe Smart Speaker uses Quectel M56-R 2G modem which has an open MCU architecture, that means the complete code for Smart Speaker is written in the modem itself. No external MCU required. This makes it a very cost effective solution for a device like this.

For Battery charging Linear battery charger IC (LP28053A) is used which can charge the battery with 1A current and has all the protections like deep discharge, over charging, etc.

Datasheet of LP28053A


It uses a buck-boost converter (LP5314) to convert battery voltage to voltage required to power the modem and other circuit on board.

The audio signals are generated by the modem itself but an external 3W D Class Amplifier is used, LPA2010.


PCB Antenna is used for Cellular Modem


On the back side of the PCB you can see SIM connector and option for eSIM as well.


These pads with gold polish along with Silicon rubber Keys with carbon pads forms soft keys.

These are the LEDs for indicating status of Power, Battery charging, etc.

I hope you found this teardown useful and learned something new. If you have any questions, please feel free to ask.
I am currently working as an embedded systems design consultant and helping companies build custom embedded products, develop test automation solution for their PCB or complete product.
If you have any feedback about the blog, you can share in the comments below or you can also contact me directly.
Read more interesting articles on Embedded Systems Design.
Fantastic concept..!