

CH32V003, why so much noise about it?
The CH32V003 is a 10-cent RISC-V microcontroller from WCH. It is a unique and exciting chip for a number of reasons.
First, it is one of the cheapest microcontrollers on the market, making it ideal for cost-sensitive applications. Second, it is based on the RISC-V architecture, which is an open and royalty-free instruction set architecture.
This means that engineers can develop software for the CH32V003 using a variety of tools and compilers.


Technical Spec
- 32-bit RISCV 2A Core
- Up to 48MHz system frequency
- 2KB SRAM, 16KB Flash
- 1x DMA controller
- 1x Op Amp Comparator
- 10-bit ADC
- 1x 16-bit advanced timer and 1x 16-bit general-purpose timer
- 2x watchdog timers and 1x 32-bit system time base timer
- 1x USART
- 1x I2C
- 1x SPI interface
- upto 18 I/O ports, mirroring an external interrupt
- 64-bit chip unique ID
- Serial 1-Wire Debug Interface
- Multiple low power modes: sleep, standby
- Supply voltage: 3.3/5V
- Power-on/power-off reset, programmable voltage detector
- Package form: TSSOP20, QFN20, SOP16, SOP8
This MCU can be used in a wide variety of applications, including consumer electronics, Industrial automation, IoT devices, Wearables, Educational projects
Here are some specific examples of how it could be used:
- In a consumer electronics product, the MCU could be used to control a simple display or to implement a basic user interface.
- In an industrial automation application, the MCU could be used to control a motor or to read sensor data.
- In an IoT device, the MCU could be used to collect data from sensors and send it over UART/RS232/RS485 or cloud via external connectivity module.
- In a wearable device, the MCU could be used to control a display, to read sensor data, or to implement a simple user interface.
- In an educational project, the MCU could be used to teach students about RISCV, microcontrollers programming and embedded systems.
Here are some additional reasons why engineers should pay attention to the CH32V003:
- The RISC-V architecture is gaining popularity, and it is one of the most affordable RISC-V microcontrollers available.
- The MCU has a wide range of peripherals, making it suitable for a variety of cost sensitive applications.
- The MCU is easy to use and program.
- There is a growing community of developers who are using the CH32V003, and there are a number of resources available online to help engineers get started.
Overall, it is a compelling microcontroller for engineers to consider. It is affordable, versatile, and easy to use.
Development Setup for CH32V003
Hardware
- CH32V003 Development Board: To start learning CH32V003 Programming, you need a development board where CH32V003 MCU is mounted and IOs are extended on some header pins so that you can access it.
- WCH-Link Programmer: A programmer is required to Flash the program onto the CH32V003 MCU, and It can also be used for debugging the program in the development phase
How to buy the CH32V003 Kit?
In India, you can buy the CH32V003 Development kit from Evelta Electronics.
If you are outside India, you can buy the development board and programmer from Aliexpress. (The website is banned in India).
Or on Tinde the evaluation board it is available
Software
- MounRiver Studio IDE: The MounRiver IDE is a cross-platform IDE for developing applications for WCH RISC-V MCUs, including the CH32V003. It is available for Windows, macOS, and Linux.
CH32V003 Datasheet and Reference Manual
Check the latest version on WCH Website, sometimes it is difficult to download from Chinese website so I have added download links from my repository.


How to install MounRiver IDE for CH32V003
The MounRiver IDE is a powerful and easy-to-use IDE for developing applications for the CH32V003 MCU. By following the steps in this blog post, you can install and set up MounRiver IDE for CH32V003 development, create new projects, compile and program your applications, and debug your code.
For Installation follow the steps mentioned below:
Download the latest version of MounRiver IDE. If you are facing any issue in downloading IDE from their website, you an download from here MounRiver IDE V1.9 and upgrade it.
Please note that as per WCH, software support is the best available for Windows OS and good on Linux but for macOS software is very little, so be careful
- Windows:
- Extract the downloaded archive to a location on your computer.
- Open the MounRiver IDE directory and double-click on the
MounRiverIDE.exefile to launch the IDE.
- macOS:
- Extract the downloaded archive to a location on your computer.
- Open the MounRiver IDE directory and double-click on the
MounRiverIDE.appfile to launch the IDE.
- Linux:
- Extract the downloaded archive to a location on your computer. Open a terminal and navigate to the MounRiver IDE directory. Run the following command to launch the IDE:
./MounRiverIDE
Installation of the MounRiver IDE is quite simple as any other software.
Creating a new project
To create a new project in MounRiver IDE for CH32V003 development, follow these steps:
- Click on the File menu and select New > Project.
- In the New Project dialog box, select the MounRiver Project and click Next.
- In the Project Properties dialog box, enter a name for your project and select the CH32V003 MCU from the Device list.
- Click Finish to create the new project.
Compiling and programming your application
To compile and program your application to the CH32V003 MCU, follow these steps:
- Click on the Project menu and select Build Project.
- Once the project has been compiled successfully, click on the Flash menu and select Download.
- In the Download dialog box, select the compiled binary file from the File list and click Open.
- Click Download to program the binary file to the CH32V003 MCU.
Debugging your application
To debug your application, follow these steps:
- Connect the CH32V003 board to your computer using a USB cable.
- Click on the Debug menu and select Start Debugging.
- In the Debug perspective, you can set breakpoints, step through your code, and inspect the values of variables.
Compiling and Running Example Code
So, now that we have all the hardware available and MounRiver IDE is installed, we can see how to open, compile and run an existing code example. This will basically complete the “Setting up Development Environment” for CH32V003 programming.
Example codes are available on WCH website and you can download Example Codes, Evaluation Board Design Files, Schematics
Once you download the zip and extract the folder you will get two folders inside, one is EXAM where all example codes are available and another one is PUB, where you find schematic of the evaluation board, user manual, datasheet and reference manual, etc.


EXAM Folder contents


PUB Folder contents


Let us now open one GPIO toggle program and compile and run it.
Go to File>Load


Browse the folder where examples are downloaded.

Chose the GPIO folder

Go inside the folder and double click on the project file to load the project.

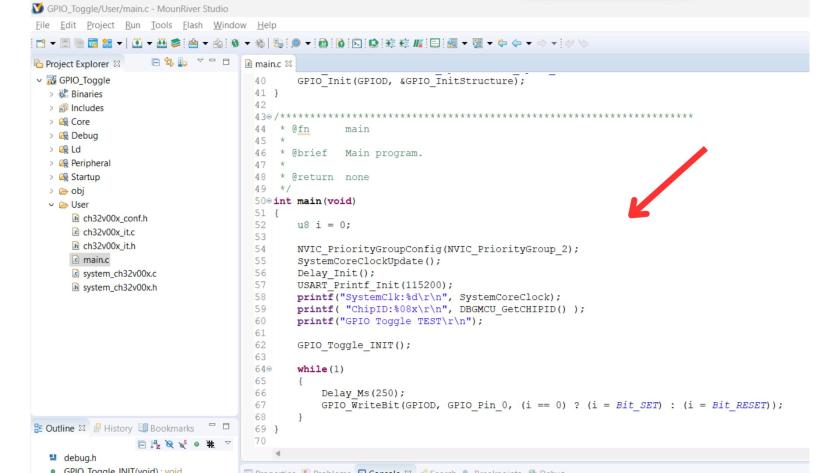
Once project is loaded, open the main.c and see the code, it has two main section/functions, GPIO_Toggle_INIT where it configures a particular(D0) GPIO as output, sets its mode as Push-Pull and its speed to 50Mhz(you can set to other speed also like 10MHz.

In the main function, you see System Clock is set, a delay is given to settle the clock and then Printf is initialized so you can print some debug output, you can ignore them for now.
Next is GPIO_Toggle_INIT is called and in while (1) , GPIO write Bit function is called with 250mSec delay.
GPIO_WriteBit function basically is used to set the Pin/Bit high or Low.
Now to built the project, go to Project>>Build Project

Program will be compiled and you will get console output as shown below. If code has no error it will be compiled showing 0 error, 0 warnings and how much memory each section of the code took, see TEXT, DATA, BSS, DEC.

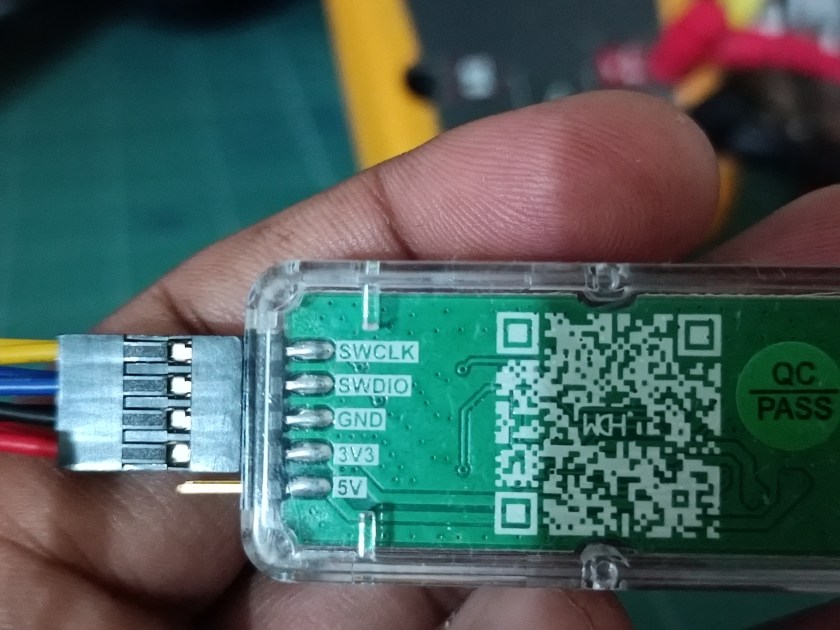
In order to Flash the code, connect the Programmer and development board to the programmer with 3.3V, GND and SWDIO pin. CH32V003 needs only one pin for programming as it is a one-wire programing interface.


To Flash the program go to Flash>>Download

After Flashing is done, you will get console output as shown in the image below. This shows program is flashed successfully and you will see LED blink program working on your development board.

See Blink LED/Toggle GPIO program in the action in the video below:

I hope you have learned how to setup the development environment, compile and run your first program successfully on CH32V003 MCU.
See also:
- Setting up the Development Environment for CH32V003: Compile and Run first example code
- CH32V003: GPIO as Output
- CH32V003: GPIO as Input (Polling, Interrupt)
- CH32V003: UART Transmit / Receive data
- CH32V003: PWM output with Frequency and Duty Cycle Control
- CH32V003: ADC for analog signal measurement
- CH32V003: I2C Interface
- CH32V003: SPI Interface
- CH32V003: Timer Interrupt
- CH32V003: How to read 64-bit Unique ID
I am currently working as an embedded systems design consultant and helping companies build custom embedded products, develop test automation solution for their PCB.
If you have any feedback about the blog, you can share in the comments below or you can also contact me directly.
Read more interesting articles on Embedded Systems Design.